
Adding a Joint Owner
MUST BE COMPLETED THROUGH THE APPLICATION WORKFLOW
- Open a Transaction work area and search for the person’s accounts that the joint owner will be added to and verify primary owner’s contact information
- Open a second Transaction work area
- If the Joint Owner already has a shell record – verify that all their contact information is up to date
- If the Joint Owner does not have a shell record – create one
- From the shell record of the Primary account owner – Navigate to Additional Options > Apply for Membership
- Type: 3 – Add Account Signer
- Branch: Select your branch
- Channel: Select your channel
- Processor: Should default to your name
- Click Insert and Work
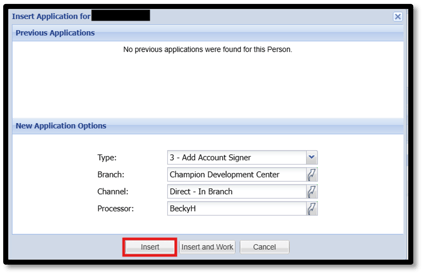
- Applications should pop up automatically with the steps of the workflow in the Relationship Tree
- If the application does not pop up automatically – click on the application at the bottom of your relationship tree
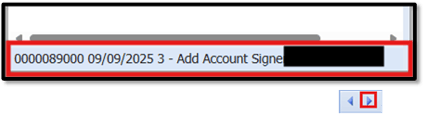
- Complete the Workflow steps in Order – Blue arrow forward to save information and move to the next step
- Application Information
- Next to the Tab with the primary account owner’s name, click the Tab that says “Add”
- A search box will pop up to allow you to search for the shell record of the joint owner being added (you can also add another tab if there are more joint owners being added or if adding a beneficiary)
- This is a second chance for us to verify the contact information for the primary and joint owners on the account.
- If you do have to update any contact information within the workflow, you must click on “Update Person Records” for it to save to the member’s shell record.
- At least one year of Address History must be added or it will not allow us to move to the next step of the workflow
- Blue arrow forward
- Application Information
-
- Credit Pull
- Credit Pull Type: Equifax Soft Pull
- Primary: Select Joint Owner’s Name (We do not need to pull credit for the Primary Owner)
- Joint: Select None
- Click Initiate Report

- Update the Credit Pull Type to Chexsystems and repeat the steps above
- Blue arrow forward (A Warning message will appear stating that the primary owner does not have an associated credit report – this is OK. Click Post twice
- Credit Pull
-
- Account Share Creation
- Select the Member Number and click Accept Selected
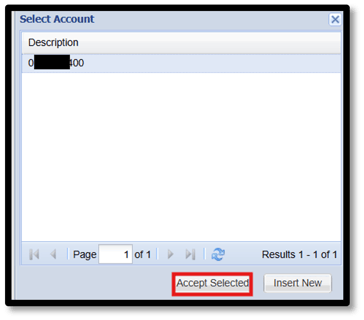
- Since we are not opening any new shares currently, we do not need to select any shares on this step,
- Blue arrow forward
- Additional Shares Options
- To the very right of the screen – select Show all Shares
- This will show the accounts that we are able to add to the joint owner to – if adding to all shares, select Add Person to All Shares or you can add a personal link to each share separately

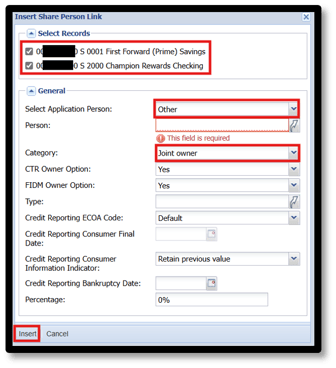
- When the Insert Share Person Link box pops up, select the shares that the person will be added to
- Select Applicant Person: You will be able to select the Joint Owner’s Name from the drop down here
- Category: Select the Person’s Relationship on the Account here
- Click Insert
- Blue arrow forward
- Card File Maintenance
- On this step, the Primary Owner’s card relationship will pop up automatically.
- At the bottom of the screen, click Add Card
- Applicant: Select Joint Owner’s Name – Click Ok
- Card Type: Debit
- Primary Account: Select the Member Number this card is to be attached to – BE CAREFUL! There can be more than one option here
- Card Access Options: Select the Shares that the Joint Owner was added to – Be sure to only add card access for accounts joint owner is being added to
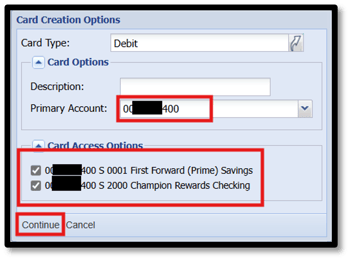
- Continue
- If creating card in branch, complete instant issue process
- Blue arrow forward
- On this step, the Primary Owner’s card relationship will pop up automatically.
- Account Share Creation
-
- Documents
- Create and have member sign documents
- Blue arrow forward
- Documents