
Adding Additional Shares for Existing Members
-
Open a Transaction work area.
-
Search for the member.
-
Navigate to Additional Options > Apply For Membership.
-
In the Type drop-down list, select Additional Savings/Certificate
-
Select or search for the Channel. For example, if the person is in the branch applying for membership, select Branch.
-
Click Insert and Work.
-
If the Application does not pull up automatically – check the bottom of the relationship tree
-
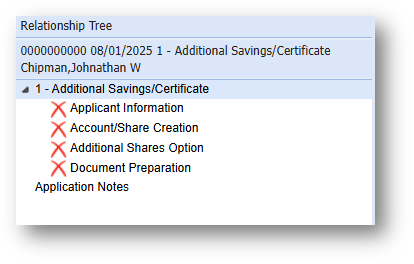
Applicant Information
-
Complete the Applicant Information step.
-
Add Joint/Beneficiary if applicable
-
Best Practice is to make sure all member information is updated before starting the workflow
-
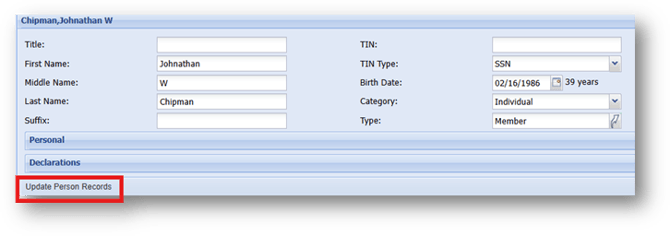
Information is updated during the workflow, be sure to click Update Person Records – if not, it only changes this information on the application – it does not update their record.
-
Blue Arrow Forward to move forward to the next workflow step.
-
In the Select Account window, click the existing account number in which you want to add a share or share draft.
-
Click Accept Selected.
-
Account Share Creation
- All existing account defaults, shares, and certificates are displayed.
- In the Share Options panel, select the new share to be added to the account. If you are creating a share, you do not need to modify any fields.
- If you are creating a certificate share, enter the initial deposit in the Opening Balance field. This is not the deposit; the information is used to dictate the dividend rate.
-
Click the right blue arrow to move forward to the next workflow step.
Additional Shares Option
- If there are no Joint Owners or Beneficiaries being added to share(s) you can blue arrow forward to the next step
- If adding a Joint or Beneficiary – click Add Person to all Shares
- Select Records: Select the accounts they need to be added to
- Select Application Person: Use the dropdown to select the person you added during the the Application Information step
- Category: Select Joint Owner or Beneficiary
- Joint Owner – CTR – YES / FIDM – YES
- Beneficiary – CTR – NO / FIDM – NO
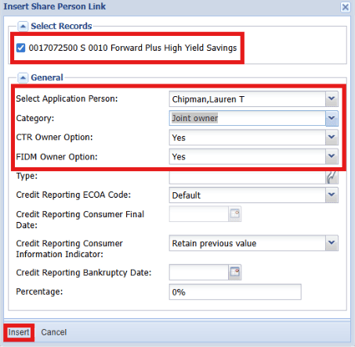
- INSERT
- Blue Arrow Forward
Documents
- Create Documents and Attach Signature
- Complete Workflow
- Remove Task from Queue unless waiting on signatures