
KeyInsight - Ebranch
- Interaction - a one-time event for informational purposes
- Completed by the person who is entering the Keyinsight
- Opportunity - an interaction that requires follow-up by another department
- Completed by another person or department
Icons:
|
Chevron |
Opens and closes the Account Summary and KeyInsight panels. |
|
|
Chevron |
This button opens and closes the KeyInsight panel only. |
|
|
Binoculars |
This button opens the KeyInsight Filter Options window so you can change the default and current view. |
|
|
Show in Popup |
This button displays the KeyInsight panel in a window. |
|
|
Pin Interaction |
This button pins a new Interaction to the Transaction work area tab that you are currently viewing. You must click the Pin button before you click the Add button to add an Interaction. |
|


Filter Viewing Options
- Click on binoculars
- Current View – View for the current member ONLY
- Default View – set preferences on what to view for all members
Create an Interaction
From the Account Summary Panel- Click the Chevron icon to expand the KeyInsight panel if needed
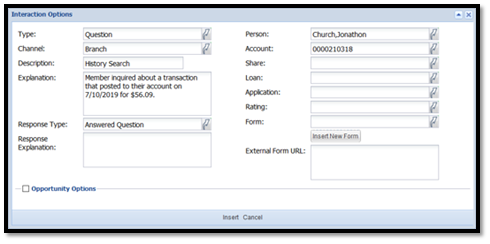
- Click the Add Interaction icon
- Fill in required fields:
- Type– type or press the down arrow key to select interaction
- Description - enter a brief description of the interaction
- Explanation - enter a detailed explanation of the interaction
- Response Type– type or press the down arrow and select the desired response to the interaction.
- Response Explanation – insert an explanation if needed (ex. Denied members request for fee refund)
- Click insert to create and complete the interaction
Create an Opportunity
*If the opportunity you are creating requires a form signed by the member, you will need to create and email your form to the member FIRST*
Once the member has signed the form, you will need to save it to your desktop and then follow these steps:
In the KeyInsight panel
- Click the ‘Add Interaction’ icon
- In the Interaction Options window:
- Type: push down arrow or start typing to select opportunity
- Channel: will auto populate to your personal channel
- If you need to adjust this, delete selection and hit down arrow to choose appropriate channel.
- Description – enter if needed
- Explanation - enter if needed
- Response type – leave blank
- Response explanation – leave blank
- Check the opportunity options box
- Default and Type fields will populate automatically
- Explanation – be sure to answer these questions for the department that will be completing the request
- DO NOT delete anything in this section
- If no Forms need to be submitted with this request, click insert.
- This will send your opportunity to the queue for the department that will be working it.
- If a form needs to be submitted with your request – see below.
Inserting a Form
Click ‘Insert New Form’ above the Opportunity Options section
- Answer ‘yes’ if you have finished filling out the interaction portion
- Answer ‘no’ if you need to add anything additional to the interaction portion
- The ‘process form’ window will open
- On the left side
- Form Type: Select Form type you will be uploading
- On the right side
- Primary Record – Type and select the member number
- Select the Share: S 0001 First Forward Savings
- Click ‘upload’
- On the left side
- In the ‘options’ box, click ‘select’
- Browse – Find the signed document that you saved to your desktop
- Choose document and click ‘open’
- Click OK and then insert
- A confirmation box will appear, click 'Continue'
Attach additional information documents to member profile
- Scan documentation into Branches Scanned Item folder
- Open a transaction work area, and pull up member profile
- Hover over member number
- Select ‘Document’
- The form window will open
- On the left side – form type: OPS_Miscellaneous Document
- On the right side – primary record: member number will be here
- You will not need to select a share for this
- Click Upload
- A window will open – click ‘Select’ under ‘Options’
- Click ‘Browse’ and find needed document
- Click on the intended file, and click ‘Open’
- Click ‘Ok’ and then ‘Insert’ at the bottom of the window.
- You will be asked to perform a File Transfer
- Select Continue