Loan Modification – Adding Warranty
New Loan Application Required – No Credit Pull
Loan Officer
- Submit a New Loan Application in Meridian Link with comments that member is Requesting to add GAP to their current loan
- Funding Page:
- Approved Amount: 3 Day Payoff Balance
- Include DP if included on current loan
- Loan Fee: $0.00
- Due Date: Enter due date on current loan
- Warranty: Quote and Issue Warranty & Retrieve Documents
- Funding Page:
- Discuss new loan payment with member
- If member wants to move forward, send Application to Processing Queue with the following comments for Loan Ops:
- Sub Action Docs to Add Warranty:
- Signing Method –
- New Payment Amount –
- Sub Action Docs to Add Warranty:
Loan Ops
- Send Subsequent Action Form & Warranty Contract in Meridian Link showing new payment and notate what the modification is for
- Once forms are signed, perform maintenance in Keystone:
- Open Relationship Tree and click on the loan to open the Update tab
- Click Project
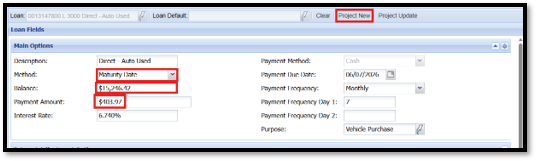
- Under Main Options:
- Change the Method to Maturity Date
- Change the Balance to the Approved Amount in Meridian Link + Warranty Price
- Change the Payment Amount to Payment in Meridian Link
- Click Project New
- Click Modify Loan - make sure the only thing changing is the payment by comparing the “Loan Before Modification” and “Loan After Modification”
- Click Post Modification
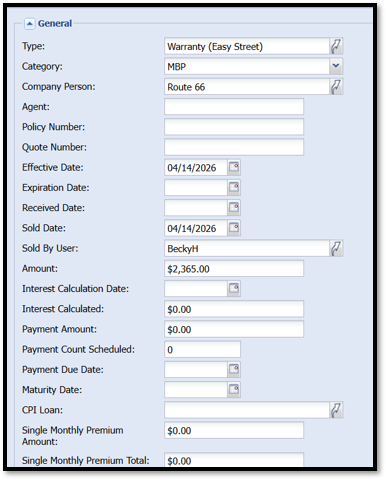
- Insert the Loan Collateral Record in the Relationship Tree
- Right Click the Loan Collateral > Insert > Insert Loan Collateral Insurance > Insert New
-
-
Click Insert
-
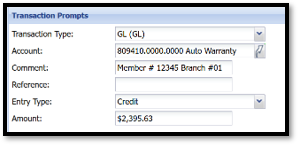
- Advance funds from the loan to cover the amount of the Warranty
- Credit GL – 809410.0000.0000 – Auto Warranty
- Comment: Member # and Branch #
- Credit GL – 809410.0000.0000 – Auto Warranty