
Removing Dormancy Status
There are two ways to remove dormancy status from an account
Post a Transaction
- Open a Transaction work area
- Search for a member
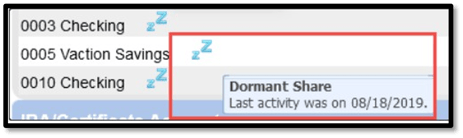
- Hover over the Dormant icon to view the Last Activity Date to verify the dormancy status in the Account Summary panel
- In the Transaction Prompts, select the desired transaction in the Transaction Type with the dormant share
- Offset the transaction with additional transactions so that your Transaction Balance is $0.00
- Click Post to complete the transaction
- This posted transaction will remove the account from dormancy status
Manually Update Last Activity Date
- Open a Transaction work area
- Search for the member
- Hover over the Dormant icon to view the Last Activity Date to verify the dormancy status in the Account Summary panel (shown above)
- Open the Relationship Tree
- Click the dormant share to open the share record
- In the Last Activity Date field, enter the current date
- Click Update at the bottom of the record
- Verify that the transaction removed the dormancy status